由于众所周知的原因,我们总会遇到搭建一个安全的私有网络环境的需求。本文介绍一个当前安全、稳定的解决方案。相对其他的解决方案,优势有:
- 稳定 : 底层连接使用 UDP ,相对于 TCP 长连接,网络质量和稳定性更高。且推荐在同一个云ISP环境内跨区域,能够提供更加稳定的网络质量。
- 可靠 : 在网路的中间增加一个节点,比直接连接的情况,受到的干扰较少。且就近访问,网络速度更快。
- 安全 : 全部使用开源软件,且资源私有化,保证网络环境的安全性。
- 普适 : 任一节点所在网络环境,可以被其他任一节点共享。可以适用的实际应用场景最广泛。
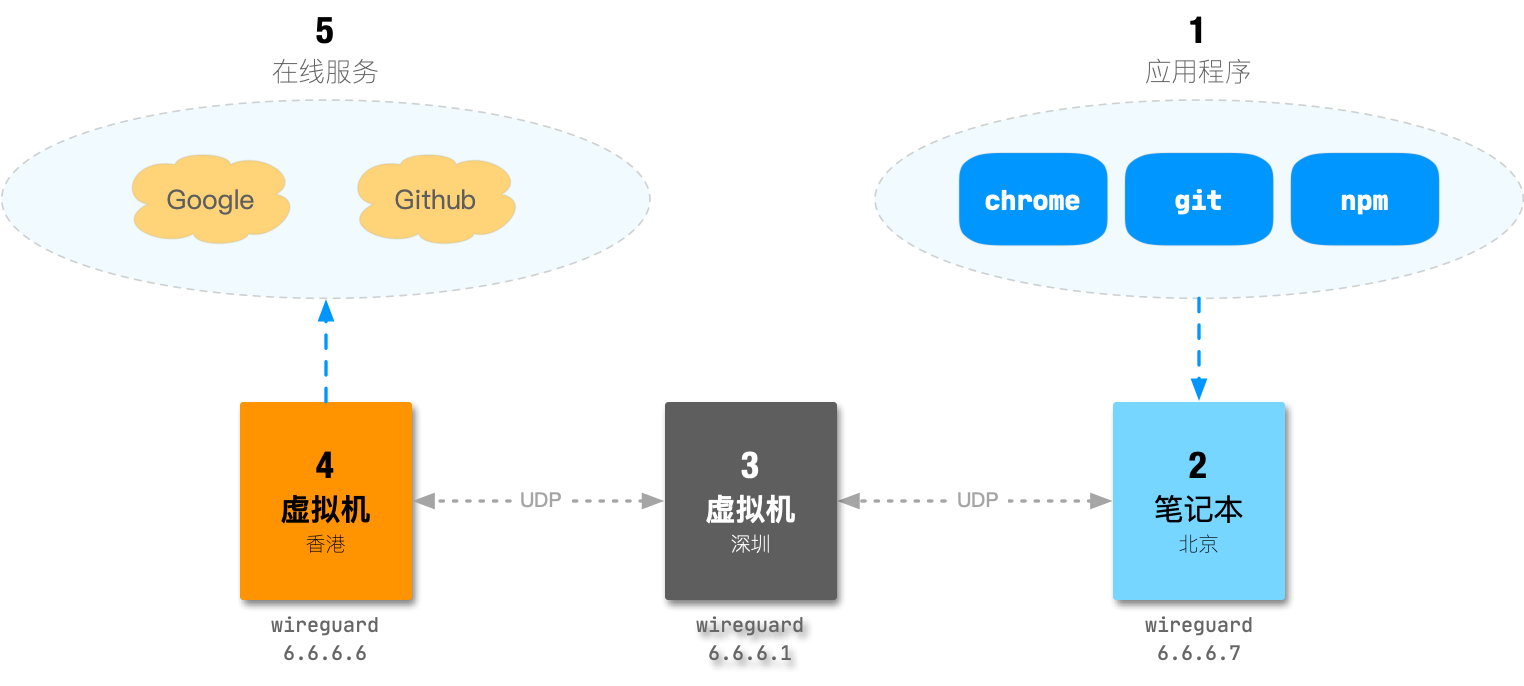
网络拓扑
环境需求
- 图中 虚拟机 3, 虚拟机 4 请在同一家公有云平台购买(网络连接延时更优秀),操作系统选择云平台上的
CentOS 7 X86_64最新映像即可。
费用说明
以某公有云平台为例,费用项如下:
| 对象 | 配置 | 资费 |
|---|---|---|
| (深圳)虚拟机 3 | 1核512M, 无公网IP | 约24元/月, 或500+元/5年 |
| (香港)虚拟机 4 | 1核512M, 无公网IP | 约29元/月, 或500+元/5年 |
| 深圳虚拟机的弹性公网IP | 选择按量计费模式,带宽100M | 0.8元/G,或购买流量包 |
| 香港虚拟机的弹性公网IP | 选择按量计费模式,带宽100M | 1.0元/G,或购买流量包 |
费用合计预估:
- 基础设施 200元/年 :按一次性购买基础设施(2台虚拟机)时长5年计算。
- 网络带宽 1.8元/G :这是最贵的计费方式,如果购买流量包,会更便宜。
效果:
- 支撑的网络设备数量不限制
- 带宽最优 (如 1080p 的视频播放)
- 可以将各个不同局域网的设备统一管理,比如企业的办事处分支机构,个人的家庭网络等
搭建步骤
1. 安装 wireguard 软件
图中 虚拟机 3 , 虚拟机 4 为 CentOS 7 X86_64 环境,安装 wireguard 方法如下:
wget -O /etc/yum.repos.d/wireguard.repo https://copr.fedorainfracloud.org/coprs/jdoss/wireguard/repo/epel-7/jdoss-wireguard-epel-7.repo
yum install epel-release wireguard-dkms wireguard-tools
初始化 虚拟机 3, 虚拟机 4 的 wireguard 配置文件,执行命令:
mkdir /etc/wireguard
(umask 077 && printf "[Interface]\nPrivateKey = " | sudo tee /etc/wireguard/wg0.conf > /dev/null)
wg genkey | sudo tee -a /etc/wireguard/wg0.conf | wg pubkey | sudo tee /etc/wireguard/publickey
图中 笔记本 2 为你自己的设备,可以是台式机,服务器,树莓派等各种支持 wireguard 的设备,请查找相关资料安装 Wireguard 软件即可。
2. 配置 wireguard
提示
- 示例的 CentOS 7 环境,wireguard 公钥存放在
/etc/wireguard/publickey中。 - 请在云平台的网络安全组中开放 虚拟机 3 和 虚拟机 4 所在的网络的 UDP 端口(具体端口请参看下面 wireguard 配置)。
虚拟机 3
图中 虚拟机 3 为我们的一个中间节点,我们希望其作为服务器(Server)的角色。因此需要固定 UDP 监听的端口,方便客户端角色连接过来。
最终 虚拟机 3 的 /etc/wireguard/wg0.conf 文件配置如下:
[Interface]
Address = 6.6.6.1/32
PrivateKey = <自身的私钥>
ListenPort = 12345

[Peer]
PublicKey =  <虚拟机 4 的 wireguard 公钥>
AllowedIPs = 6.6.6.6/32

[Peer]
PublicKey =  <笔记本 2 的 wireguard 公钥>
AllowedIPs = 6.6.6.7/32
配置完成后,启动服务
systemctl start wg-quick@wg0.service虚拟机 4
图中 虚拟机 4 是对外的节点,由于其公网特性和安全要求,虽然是客户端角色,但是我们也固定其 UDP 监听端口。这样方便我们在云平台的安全组中开放该 UDP 端口的访问权限。
最终 虚拟机 4 的 /etc/wireguard/wg0.conf 文件配置如下:
[Interface]
Address = 6.6.6.6/32
PrivateKey = <自身的私钥>
ListenPort = 54321

[Peer]
PublicKey = <虚拟机 3 的 wireguard 公钥>
AllowedIPs = 6.6.6.0/24
Endpoint = <虚拟机 3 的公网IP>:12345
PersistentKeepalive = 25
配置完成后,启动服务
systemctl start wg-quick@wg0.service笔记本 2
通常是我们自己的笔记本/台式机,在局域网内,作为纯的客户端角色。wireguard 配置示例:
[Interface]
PrivateKey = <自身私钥>
Address = 6.6.6.7/32

[Peer]
PublicKey = <虚拟机 3的 wireguard 公钥>
AllowedIPs = 6.6.6.0/24
Endpoint = <虚拟机 3 公网IP>:12345
PersistentKeepalive = 25
代理
在 虚拟机 4 启动代理服务
我们使用 docker-compose 启动2个代理服务:
mkdir -pv /srv/lab/proxy/
cd /srv/lab/proxy/
vi docker-compose.yaml
vi squid.conf
docker-compose.yaml 内容如下:
version: "3"
services:
  squid:
    image: sameersbn/squid:3.3.8-20
    ports:
    - 6.6.6.6:3128:3128
    volumes:
    - ./squid.conf:/etc/squid/squid.conf

  goproxy:
    image: ooclab/goproxy:v1.0.0
    ports:
    - 6.6.6.6:8000:8000
squid.conf 配置如下:
acl Safe_ports port 80 # http
acl Safe_ports port 443 # https
acl CONNECT method CONNECT
http_access allow all
http_port 3128
visible_hostname proxy
header_access Via deny all
header_access X-Forwarded-For deny all
forwarded_for off
via off
启动服务
cd /srv/lab/proxy/
docker-compose up -d
这样在整个 wireguard 网络环境的任何节点都可以使用以下2个代理:
| 代理类型 | IP地址 | 端口 |
|---|---|---|
| HTTP | 6.6.6.6 | 3128 |
| SOCKS5 | 6.6.6.6 | 8000 |
测试代理:
# curl -s --socks5 6.6.6.6:8000 http://httpbin.org/ip
{
  "origin": "<虚拟机 4 的公网IP>"
}

# curl -s --proxy http://6.6.6.6:3128 http://httpbin.org/ip
{
  "origin": "6.6.6.7, <虚拟机 4 的公网IP>"
}
FAQ: 如果出现错误 FATAL: xcalloc: Unable to allocate 1048576 blocks of 392 bytes!
FATAL: xcalloc: Unable to allocate 1048576 blocks of 392 bytes!可以考虑使用文件作为 swap ,增大交换分区大小:
fallocate -l 2G /swapfile
ls -lh /swapfile
chmod 600 /swapfile
mkswap /swapfile
swapon /swapfile
free
重启 squid
在笔记本 2 使用代理服务
chrome
推荐使用 SwitchyOmega 插件
git
如果是 Unix-Like 系统(如 Linux, MacOS),可以这样:
export https_proxy=http://6.6.6.6:3128
git clone ...
网络延时测试
在 虚拟机 3 上 ping 虚拟机 4 :
# ping 6.6.6.6
PING 6.6.6.6 (6.6.6.6) 56(84) bytes of data.
64 bytes from 6.6.6.6: icmp_seq=1 ttl=64 time=41.5 ms
64 bytes from 6.6.6.6: icmp_seq=2 ttl=64 time=42.5 ms
64 bytes from 6.6.6.6: icmp_seq=3 ttl=64 time=36.6 ms
64 bytes from 6.6.6.6: icmp_seq=4 ttl=64 time=43.4 ms
64 bytes from 6.6.6.6: icmp_seq=5 ttl=64 time=38.7 ms
64 bytes from 6.6.6.6: icmp_seq=6 ttl=64 time=42.5 ms
在我的笔记本上 ping 虚拟机 3 :
➜  ~ ping 6.6.6.1
PING 6.6.6.1 (6.6.6.1): 56 data bytes
64 bytes from 6.6.6.1: icmp_seq=0 ttl=64 time=48.339 ms
64 bytes from 6.6.6.1: icmp_seq=1 ttl=64 time=49.156 ms
64 bytes from 6.6.6.1: icmp_seq=2 ttl=64 time=49.851 ms
64 bytes from 6.6.6.1: icmp_seq=3 ttl=64 time=48.470 ms
64 bytes from 6.6.6.1: icmp_seq=4 ttl=64 time=65.624 ms
64 bytes from 6.6.6.1: icmp_seq=5 ttl=64 time=49.118 ms
64 bytes from 6.6.6.1: icmp_seq=6 ttl=64 time=48.634 ms
在我的笔记本上 ping 虚拟机 4 (经过 虚拟机 3) :
➜  ~ ping 6.6.6.6
PING 6.6.6.6 (6.6.6.6): 56 data bytes
64 bytes from 6.6.6.6: icmp_seq=0 ttl=63 time=95.807 ms
64 bytes from 6.6.6.6: icmp_seq=1 ttl=63 time=87.188 ms
64 bytes from 6.6.6.6: icmp_seq=2 ttl=63 time=89.748 ms
64 bytes from 6.6.6.6: icmp_seq=3 ttl=63 time=88.410 ms
64 bytes from 6.6.6.6: icmp_seq=4 ttl=63 time=81.577 ms
64 bytes from 6.6.6.6: icmp_seq=5 ttl=63 time=85.932 ms
64 bytes from 6.6.6.6: icmp_seq=6 ttl=63 time=91.225 ms
常用操作
查看 wg 网口
在 Linux 系统,以 root 权限执行 wg 命令:
# wg
interface: wg0
  public key: <本机 wireguard 公钥>
  private key: (hidden)
  listening port: <本机 wireguard UDP端口>

peer: <虚拟机 3 的公网IP>
  endpoint: <虚拟机 3 IP>:12345
  allowed ips: 6.6.6.0/24
  latest handshake: 46 seconds ago
  transfer: 5.26 MiB received, 12.11 MiB sent
  persistent keepalive: every 25 seconds
FAQ
如何增加一个新的 wireguard 节点?
每增加一个 wireguard 节点,都在要 虚拟机 3 上的 /etc/wireguard/wg0.conf 添加 Peer 配置,示例:
[Peer]
PublicKey =  <笔记本 2 的 wireguard 公钥>
AllowedIPs = 6.6.6.7/32
重启 wireguard 服务:
systemctl restart wg-quick@wg0.service节点之间无法 ping 通怎么办?
尝试 1
如果节点之间无法 ping 通,请在 虚拟机 3 添加 iptables 规则:
iptables -t filter -A FORWARD -o wg0 -j ACCEPT尝试 2
或者查看 ipv4 的转发设置是否打开:
cat /proc/sys/net/ipv4/ip_forward打开转发:
echo 1 > /proc/sys/net/ipv4/ip_forward永久打开转发,在 /etc/sysctl.conf 文件追加:
net.ipv4.ip_forward = 1即可。
感谢
- Squid 配置,感谢 Haoliang Zhang 提供配置并测试